This is a sketch I'm doing just for fun. (The girls from UFO!) It's not finished... I took a screengrab.
As you can see, I can zoom in and out in the Drawing View to do my details or to paint, and at the same time - the Camera View stays the same such that I can always refer to the "bigger picture" while I draw. I can also alter my Camera View (hand tool, or zoom tool) without affecting my Drawing View. I think this is pretty cool.
In the timeline, my imported jpegs (for reference) are represented by the blue frames. Their layers are hidden right now. When I want to look at them, I disable my Drawing layers, and enable those Jpeg layers, which then show up in my Camera View on the right side.
BTW, I sketched using the Brush tool (Anti-Aliasing disabled in Open GL properties) with Tool Properties set to so that the color is added under my black brushstrokes.
ANIMATE comes with a few default workspace layouts but when I am designing or drawing a character using imported bitmaps or jpegs, the imported images only show up in Camera View, not the Drawing View.
Yes, it is possible to vectorize images into Symbols, then expand the Symbols to make them visible in the Drawing View (this is if you want to trace your scanned artwork) but if I only wish to use my imported jpegs as visual reference while I am designing or drawing, then it makes no sense to vectorize them.
Francisco from ToonBoom offered a cool little tip - We can rearrange the modules so that both the Drawing and Camera Views are positioned side by side and visible at the same time.
This is a great idea for Character Designing: I can draw in one window (Drawing View), and refer to the imported jpeg in the adjacent window (Camera View).
*As we can't publicly display some of our work due to confidentiality agreements, this pic below is something I whipped up quickly for the purpose of this blog post.
I imported the "Character Lineup" .jpeg which is what you see in the Camera View on the right, and represented as a Symbol in the timeline below. I do my rough drawing on the left in the Drawing View, which will then be cleaned up and colored. Note that the Drawing layer on the timeline is "hidden"/disabled so that it doesn't show up in the Camera View. I have the Lightbox enabled so that I can still see it in the Drawing View.
Note also that I have shifted the Tool Properties, Color and Library modules over to the left side next to the Tool bar - this is just a personal preference.
To move modules around, grab the tab and drop it wherever you want it to go.
If you drop it ON TOP OF another tab, you will be able to toggle between these tabs in the same module.
If you drop your tab ON ONE SIDE of another tab, then you will have separately-docked modules.
If you drop your tab anywhere else, it becomes a free floating module.
I don't know about anyone else, but the process of painting in ToonBoom Animate with Windows Vista O/S is still slow as hell. When I am choosing colors using the Color wheels, the program hangs and sometimes crashes. Solution: Disable Anti-aliasing in Open GL properties when working with color.
I like my new workspace for character designing. When animating, I would switch back to the Default/Animation workspace.
Sticky Keys! This is a cool timesaver tip that I learned from Eric K. Thanks, Eric!
Some common ANIMATE Drawing Tool shortcuts:
Brush - Alt + B Contour Editor - Alt + A Select - Alt + V Cutter - Alt + T Line - Alt + N Paint - Alt + K Pencil - Alt + Y Zoom - Alt + Z Transform(Animation) - Alt + Q
When you press down a key, the tool temporarily changes to whichever tool you want represented by that key. When you de-press the key, it changes back to the original tool. Examples:
DRAWING and EDITING strokes I toggle between my default BRUSH (Alt + B) and hold down A for Contour Editing and V for moving/scaling.
EYEDROPPER and FILLING I toggle between my default PAINT (Alt + K) and hold down I for selecting colors from the screen
Here is a short video showing a work in progress (also a learning process). I have just exported a scene from our STORYBOARD PRO animatic into ANIMATE. The sound track has been imported too, and the animatic drawing is in its own layer in bitmap format.
At this stage I have (roughly) animated the camera move and roughed out a layout drawing over the imported bitmap layer. There is a neat feature in ANIMATE where you can quickly copy or cut out drawings from one layer and "Paste In Place" (to use Flash lingo) on other layers. First, use the Cutter tool to cut out that drawing, then use F9 to assign it to another new or existing layer. This beats going through the motions of Copying and Pasting...
Our only gripe is that the ANIMATE Cutter tool isn't very precise and we wish that it worked more like a Flash or Photoshop lasso where you can select parts of strokes, rather than entire strokes...
I have also started drawing rough key animation poses for each character (Rocquita, Indigo and Joe 101) and when I want to reuse an earlier drawing, I can swap using the Library's Drawing Substitution Window ... just scroll to the drawing you want to swap with... This is really cool. In Flash, only Symbols are swappable, but in ANIMATE, ALL drawings on a layer are swappable.
I also think it's super cool to be able to animate the characters with the camera move already done.
SIDENOTE: My OS is Windows Vista 64-bit and it is painfully slow to draw and paint. Especially when the Auto-Flatten feature is enabled in my BRUSH Tool Properties Window. Also when I have the Onion skinning on. I was sketching with both these features enabled, and ANIMATE suddenly crashed and shut down on me. Must remember to keep SAVING!!!
UPDATE:Thanks to Eric for the tip about holding down "Alt" when using the Cutter tool. This helps!!!
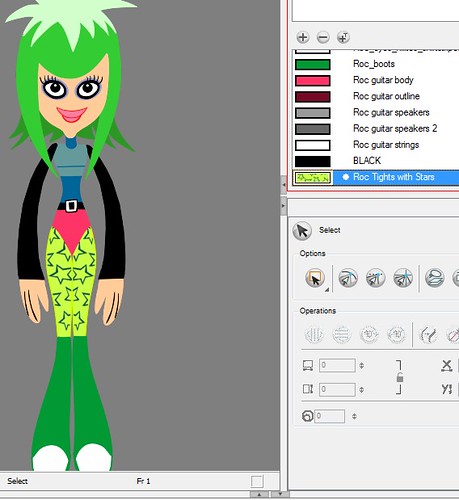
Before vector animation hit the scene, back in the "traditional animation" days we created character color palettes in Animo (remember Animo?) We LOVE that there are character color palettes in ToonBoom ANIMATE! A screengrab below shows that you can name the swatches and if you edit one color, then all drawings of that item painted with that color will change accordingly. There is also no confusion which color goes where. Color palettes are saved in a Palette library external to this file so you can easily share palettes with other artists.
I had actually created Rocquita color palettes in Toonboom DIGITAL PRO last year andimported them into this ANIMATE file.
Here are some screengrabs showing the Import Texture/Painting with Texture feature in Color Palettes.
To import a texture into the palette (In my case, it's the pattern of "stars" on Rocquita's tights), I generated a PSD file. I had already drawn this pattern in Flash so I exported the image to .bmp and saved as a .psd in Photoshop. I was originally going to create a "Mask" layer for every Leg drawing and add the stars this way, but it seemed like way too much work. This is so much more convenient! :)
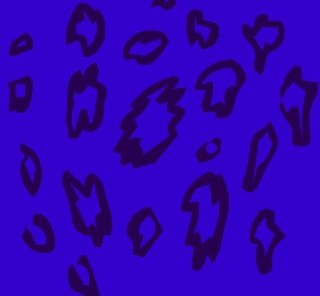
Below is another example with our character Indigo, who wears a dark blue leopard print suit.
First the PSD file of the "leopard print"
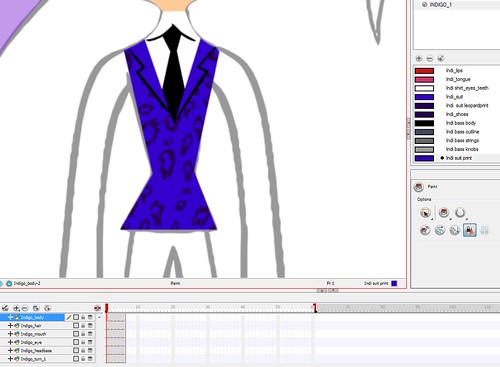
I imported the PSD into my Palette and it generate a swatch which I renamed "indi suit print". Then painted the character as normal.
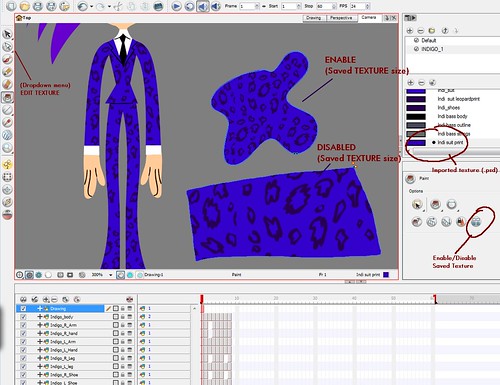
The texture fill naturally conforms to the shape that needs to be filled. So if you have a teeny weeny shape, you'll get teeny weeny leopard prints. If you have a large shape, the pattern increases in size... which was NOT what I wanted ... At first, the leopard print shape on Indigo's long pants were massive...
What's cool is that ANIMATE lets us edit the texture (scale, skew, rotate etc.) and then we can save the transformation to keep it consistent whenever we paint it.
Before you fill an area, click on the Enable/Disable Saved Texture button (I think this is what it's called) in the Paint Properties window. When Enabled is on, you get a consistent-looking pattern or texture regardless of what size the fill area is.
The screengrab above shows two sizes of leopard print - the top shape is using my Saved Texture size (same as Indigo's suit). The larger bottom shape has the feature disabled so the leopard print fill is much larger.
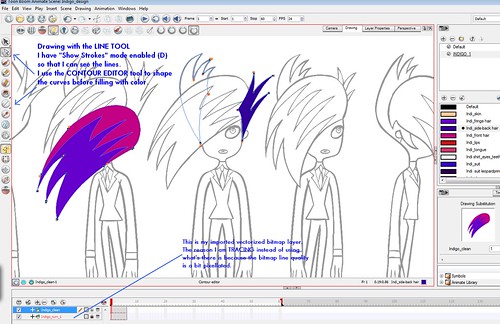
Drawing with invisible strokes
Our characters have no outlines and painting both strokes and fill areas is quite time-consuming. ANIMATE has a "flatten" tool feature so that you can merge outlines and fills that are the same color... but still.... you have to paint both first...
I was thrilled to learn recently that I can draw with "invisible strokes" in ANIMATE so I did this with my construction of Indigo. To draw with invisible strokes, create a Pencil tool setting with 0 width. In this case I was drawing with the Line and Contour Editor tools and I enabled the "Display Strokes" setting (keyboard shortcut = D) so that I could see my strokes.
I wish I had drawn Rocquita and Joe 101 this way (instead of using the Brush tool). Or maybe I could convert those brush strokes to pencil lines (I have yet to try this ANIMATE feature) to have more control over curves...
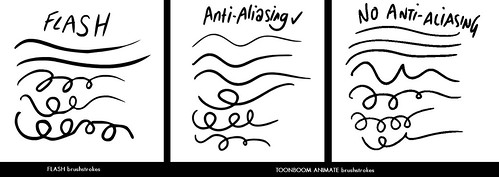
Unfortunately, what you get on screen is not true to what you draw... Flash tweaks your original linework and as you can see - those looped lines are really messed up (compared to the Toonboom versions). I would have to manipulate the strokes with the Arrow tool and pull them into shape.
TOONBOOM
What you see on screen is exactly what you draw which is great! There's a catch though... In the TOONBOOM workspace, you can have Anti-aliasing enabled or disabled. Anti-aliasing adds a "Soft and blurry" effect to the strokes. Some people may not notice this but I do, and I find this blurry effect a bit distracting, like using ink that bleeds. With the Anti-aliasing Disabled (you can toggle this setting under Preferences > Open GL) it's the total opposite effect. The strokes are pixelly and jagged. This is even more distracting so I usually go with the Anti-Alias mode.
In my ideal world, I would love it if ToonBoom's line quality was crisper, like Flash's, while maintaining its smoothness and accuracy...
Editing Strokes
To be honest though, I am so used to manipulating vectors in Flash it's weird to not have to do this in ToonBoom. Actually it's more time-consuming to edit strokes in ToonBoom because the Contour Editor feature requires a familiarity with Bezier points and handles... something I never had to learn. The thing I like about Flash is that you can just push and pull strokes into their perfect curve at ANY POINT ON THE CURVE without even having to SEE those points.
Smoothening Strokes
Both programs have a smoothening feature. I have yet to figure out how to smoothen only PART of a stroke in Animate. In Flash, you can very quickly select a part of a stroke and smoothen only this part. In Animate, the entire stroke is selected.

 so that the color is added under my black brushstrokes.


