Showing posts with label animate. Show all posts

Monday, June 13, 2011

Importing swfs From Flash Into Animate

While it is great that Animate can import and work with swfs created in Flash, I've noticed that it is sometimes hit or miss; sometimes they import - sometimes they don't.
I've just discovered a fix for this if you are using a version of Flash post-Flash 5 (I am using Flash 8). When you export a swf, in the export pop up box go to VERSION and set to either Flash 4 or Flash 5.
That will do it!

Tuesday, September 15, 2009

More Multiplane

Finally getting the blur/pull focus effects happening in the timeline

Bostie Boys - Scene 3 from Eddie Mort on Vimeo.

Monday, April 13, 2009

Trouble With Vista (by Eddie)

As anyone visiting this blog knows, I'm pretty much using Animate exclusively now - both for animation and design - and things have been going pretty good.

However, having just bought a new laptop I've realized what a lot of others - including Lili - have known for a while now; Animate and Vista do not work well together. The main problem is painting. No matter how small a fill area is, the spinning wheel will come up whenever you try to paint. Same thing happens when you try to modify a color. What should have been some very simple character designs to fill, took me ALL DAY because of the Animate/Vista incompatability.

So what is to be done? I believe Toon Boom's answer is along the lines of 'we haven't tested this to run with Vista'. But how does that help PC users? New PCs run on Vista these days. Is anyone at Toon Boom searching for a solution? And PLEASE don't tell me to go and buy a Mac....

Tuesday, March 24, 2009

Multiplane BG set up


This is a BG from our ROCQUITA pilot. Here Eddie demonstrates using the Top View to place different BG elements at varying the distances from the Camera.

Sorry, this video cuts off before we could finish because I ran out of memory on the camera SD card! But I think you get the idea... :)


Monday, March 23, 2009

Auto Lip Sync feature

I prefer to animate lip sync the "manual" way; I always scrub frame by frame and assign mouths this way. But having said this, ANIMATE's Auto Lip Sync feature is still pretty cool and can help save time or if you want to have basic lip sync without detailed attention to consonant sounds etc. 

Here is a video demo with Indigo's head:


As you can see (and not hear), ANIMATE picks the mouth positions that correspond to the sound.  There are only 8 mouth positions by default, but I can add new ones and/or swap out the mouths on any frame in the timeline. (I did these mouths very quickly for the purpose of testing out the feature... need to redraw!) You can also see the mouth positions in X-Sheet view (top right of my workspace)

NOTE: This Auto Lip Sync feature does not work with Symbol mouths. The mouths have to be Drawings. So when you create your mouths, it would help to save them as Drawings in a library template (.tpl) OR you could save them in a Symbol and then Expand the Symbol on the timeline before you Auto Detect Lip Sync and Map Lip Sync.

What I didn't show in my video is that I originally had these mouths in a Symbol and they were all facing the opposite direction inside the Symbol. After expanding the Symbol to Drawings in Timeline view, I selected all the drawings in the layer (to do this, click on the layer name, and use the Transform tool  ) and flipped them horizontally.

P.S. We will be re-demonstrating this feature and others at the ANIMATE LAUNCH in Mexico-Brazil-Argentina next week.

ANIMATE Launch


This is where we will be:

MEXICO CITY
Tuesday, March 31, 2009
6 pm - 9 pm
Museo Mexicano del DiseƱo (MUMEDI)
Francisco I. Madero 74, Colonia Centro Historico
Mexico D.F.

BUENOS AIRES
Friday, April 3, 2009
4 pm - 6 pm
Paseo La Plaza
Sala Julio Cortazar B Av. Corrientes 1660
Ciudad de Buenos Aires
6320-5392


SAO PAULO

Monday, April 6, 2009
6 pm - 9 pm
Paseo La Plaza *Change of venue
Istituto Europeo di Design - IED
Rua Maranhao, 617 - Higienopolis
Sao Paulo


Visit the ToonBoom ANIMATE WORLD TOUR website to RSVP.


Sunday, March 22, 2009

Flash vs Animate: PIVOTS

Pivots in ANIMATE are a little more complicated than they are in FLASH. In Flash, when you edit a Symbol pivot in order to reset a rotation/scale point, you enter the Symbol, select the pivot and drag it into place, and that's pretty much all there is to it.

It took a lot of trial and error (and I had to re-do a lot of messed up animation) for me to realize that there are "Pivot settings" in ANIMATE to pay attention to. Not only this, there are Drawing Pivots, Symbol Pivots and Peg Pivots and with Symbol Pivots, there are two levels of editing involved.

1. To reset the Symbol Pivot (for rotation/scaling) when you drag a Symbol's pivot to a new position in the Camera View, this is only a temporary change that applies to that one action. The pivot doesn't actually change position. It's still there.To set a new permanent Symbol pivot, click on the Pivot Tool in the left-side toolbar first, before dragging that pivot. All instances will now have the new pivot position. *This is done on the top level, not inside the Symbol.

2. You can also reset the Drawing Pivots inside the Symbol. These pivots are not linked to the Symbol Pivot unless if you Copy Pivot to Parent Symbol after editing each pivot. Note that your Drawing Pivot and Symbol Pivot will now be the same, and I find it less confusing to work this way especially when I need to add new drawings to my Symbol.


When editing pivots inside the Symbol, note the Set Pivot For All Frames option. If this is enabled, your new pivot will apply to the entire layer of drawings inside the Symbol. If you disable this first, each drawing can have its own pivot position. This is important when the drawings (eg, hands or legs) inside a Symbol are positioned all over the place and they don't share the same pivot position.

And then using the Library Drawing Substitution Feature, when I swap between different drawings, even though they are not drawn registered together, when I am in the Top Level/Camera View, they will appear registered in the right place.

A little word of warning: If a Symbol's pivot point is reset, all CHILD SYMBOLS attached to this Symbol will also be affected.

I hope this makes sense...

Any tips? Questions? Solutions? Please share!


Thursday, March 19, 2009

A quick look at Inverse Kinematics (I.K.)

This is a demo of what I.K. looks like in ANIMATE using one of our "Karaokean" characters. This mode of animation is useful for arms and legs or where joints play a big part in movement. It is almost as if your 2D character were a 3D-puppet.


Intro to Inverse Kinematics

On Vimeo, Justin of CartoonSmart.com has posted some very detailed video tutorials on using a combination of "Inverse Kinematics" and "Forward Kinematics" (aka the "normal" way with Transform Tool)  to animate a walk cycle. Check out the tutorials HERE and HERE.

ROCQUITA: work in progress, notes on Layer organization


Sharing a capture of the ANIMATE workspace as I animate the characters in this scene.
CLICK HERE TO SEE THIS BIGGER

Notice that each character has their own single Master PEG layer on the main timeline. It took me a while to get my head around what Peg layers are and do because this feature is unique to ToonBoom and doesn't exist in Flash. In Flash, we tend to organize body parts in symbols within symbols within symbols and there is a lot of double-clicking deep into symbols within symbols to do what we need to do.

ANIMATE favors organization on parent-child layers that are all visible and accessible on the main timeline.

In a nutshell, a Peg layer is like a "controlling layer" under which all the layers of a character are registered. The Peg layer is expandable and collapsible.

Here is the Indigo Master Peg layer expanded:


CLICK HERE TO SEE THIS BIGGER

In ANIMATE, Keyframes are represented by black dots on the timeline and these can be Motion Keyframes (tweening, as represented by arrow on the timeline) or Stop Motion Keyframes (no tweening).

Interesting distinction: In Flash we MUST add a keyframe on the timeline to change a drawing from one frame to the next.

In Animate, it depends on how the drawing is being changed. If the drawing is to be repositioned, scaled, rotated etc. from one frame to the next, then we need to insert keyframes. If the drawing is to be replaced by a different drawing or an edited version, there is no need to add a keyframe. We use the "Drawing Substitution Window" OR > "Duplicate Drawings" to create an edited version. In the timeline screengrab above, the vertical lines separating the grey frames show where there are "drawing substitutions". I am still getting used to this concept.

*When the "Animate mode" button is enabled , ANIMATE will automatically insert keyframes on the timeline where needed... this is a timesaver!! And the beauty of having a Master Peg layer is that if you move something on one layer, all the other layers remain linked/registered.

Tip: If I want to edit a drawing and not be distracted by other drawings/layers or don't want to accidentally select something on another layer, this button above the timeline will hide ALL layers except the one that I am currently working on.

We are learning new things each day and as with learning any new program, it will take a little while before we settle on a working system or pipeline that feels right for us.

Wednesday, March 11, 2009

Assigning drawings to different layers, Drawing Substitution

Here is a short video showing a work in progress (also a learning process). I have just exported a scene from our STORYBOARD PRO animatic into ANIMATE. The sound track has been imported too, and the animatic drawing is in its own layer in bitmap format.


Assigning drawings to separate layers

At this stage I have (roughly) animated the camera move and roughed out a layout drawing over the imported bitmap layer. There is a neat feature in ANIMATE where you can quickly copy or cut out drawings from one layer and "Paste In Place" (to use Flash lingo) on other layers. First, use the Cutter tool to cut out that drawing, then use F9 to assign it to another new or existing layer. This beats going through the motions of Copying and Pasting...

Our only gripe is that the ANIMATE Cutter tool isn't very precise and we wish that it worked more like a Flash or Photoshop lasso where you can select parts of strokes, rather than entire strokes...

I have also started drawing rough key animation poses for each character (Rocquita, Indigo and Joe 101) and when I want to reuse an earlier drawing, I can swap using the Library's Drawing Substitution Window ... just scroll to the drawing you want to swap with... This is really cool. In Flash, only Symbols are swappable, but in ANIMATE, ALL drawings on a layer are swappable.

I also think it's super cool to be able to animate the characters with the camera move already done.

SIDENOTE: My OS is Windows Vista 64-bit and it is painfully slow to draw and paint. Especially when the Auto-Flatten feature is enabled in my BRUSH Tool Properties Window. Also when I have the Onion skinning on. I was sketching with both these features enabled, and ANIMATE suddenly crashed and shut down on me. Must remember to keep SAVING!!!

UPDATE: Thanks to Eric for the tip about holding down "Alt" when using the Cutter tool. This helps!!!

Wednesday, March 4, 2009

Mac or PC?

We don't really care about the "which OS is better" debate. Our question is specific to Toonboom animators.

To Toonboomers who have worked on both MACs and PCs: Have you found any differences in performance?
Does Toonboom perform better in one OS over the other? Or is there no difference?

To PC-users with Windows Vista 64-bit (Toonboom isn't fully compliant with 64-bit) - have you noticed any serious performance issues? Any significant difference when working in Windows XP Compatability Mode?

Tuesday, March 3, 2009

ToonBoom Demos - See you in LATIN AMERICA


We have been invited by ToonBoom to demonstrate ANIMATE in Mexico, Argentina and Brazil!

More details later on these ToonBoom ANIMATE Events, but so far, here are the cities and dates:

MEXICO CITY - March 31

BUENOS AIRES- April 3

SAO PAOLO - April 6

If there is anything specific that you would like to see demonstrated, please feel free to leave a comment below! :)


Thursday, February 26, 2009

Inside Joe's head - Z AXIS demo

Rigging JOE 101

Here I am rigging JOE 101 (Character from ROCQUITA).... trying out a different procedure here from the previous character.

I created the linework in Flash and imported the SWFs into Animate. I had "grouped" the body parts in Flash and what's cool is that they remain grouped when imported into Animate. Which makes it easier to assign them to separate layers. (Less painstaking than "cutting out" parts from a drawing)

In Animate, I painted and symbolized the body parts. Notice that the headphones, arms, legs... are Symbols which are identified by blue-colored cells in the main timeline. Below is a screengrab of inside Joe 101's HEAD Symbol.

Toonboom Animate: Inside Joe's head

In the video below, a demo of Toonboom's Z AXIS (forward <--> behind) in relation to character design and rigging.


Toonboom Animate: Z-AXIS demo

How to shift something backwards or forwards on the Z Axis:
  1. Insert a keyframe for where the Drawing or Symbol is.
  2. Select the Layer
  3. Click on both these tools (lower left of toolbar) - the ANIMATE tool (little person in yellow circle) and the TRANSFORM tool (square thing right below it). These will put you in "Animation Mode".
  4. Make sure that the Layer is still selected.
  5. Click on the Layer Properties tab up top right - this will show you the X, Y, and Z Axis options. Click on the little button on the right side of the Z Axis line.
  6. Drag the cursor thing up and down according to Frame position.
    Dragging UP = "F" value = forward; Dragging DOWN = "B" value = backwards.
  7. Click on Camera View tab to see changes.
Eddie: It's the same principle with creating a Multiplane Camera.

Designing and rigging ROCQUITA


I am following the exact steps in the ToonBoom Kickstart Tutorials (downloaded from the website), which are basically as follows:
  1. Draw character turnarounds, 1 pose per frame in the timeline. In this case, 4 poses.
  2. Paint character - create a palette
  3. Cut out parts of the character and assign to separate layers, doing this one pose at a time. *interestingly, in Flash we usually symbolize first, then "Distribute to layers". Here, it is suggested that you distribute first, before Symbolizing. Why? I think because Toonboom's Symbols are not free-floating objects. ToonBoom Symbols are registered to the stage/camera....
  4. Fix articulations and gaps  in each cut-out part (Eraser, brush tools)
  5. Then go back and do steps 2 to 4 for all the other turnaround poses. Assign parts to the layers that you have set up... Cutter tool & F9
  6. Drag each layer to the SYMBOLS directory in the Library. 
  7. Delete everything on the current timeline, and drag the Symbols out of the Library onto stage. Because the Symbols were registered to the stage to begin with, they will all appear in their correct positions. 
  8. Set Symbol pivots. eg, Hand to arm, arm to shoulder, etc.
  9. Set heirarchies (see pic above) 
  10. Select all layers and frames and drag to Library  - the rigged character will be stored as a .tpl (= template) and can be reused in any scene.
This is as much as I have done so far...

An interesting observation:
ToonBoom Animate has a z-axis in addition to x and y axes. When a character turns and the other arm goes BEHIND the body... instead of creating a new layer UNDER the body... you can keep the other arm on its same layer but change it's Z-AXIS position so that the arm goes under the body. This is really cool. 

Brush strokes: Flash vs Toonboom


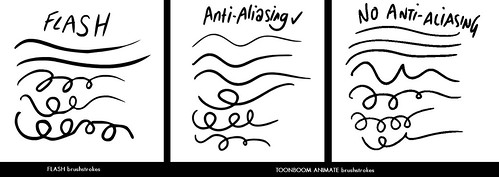
The first thing you notice about drawing in ANIMATE (compared to Flash) is the much improved line quality and accuracy!  

CLICK HERE to see enlarged pic. These are screengrabs of the brush strokes created in Flash and TB Animate. 

FLASH
Unfortunately, what you get on screen is not true to what you draw... Flash tweaks your original linework and as you can see - those looped lines are really messed up (compared to the Toonboom versions). I would have to manipulate the strokes with the Arrow tool and pull them into shape.  

TOONBOOM 
What you see on screen is exactly what you draw which is great! There's a catch though... In the TOONBOOM workspace, you can have Anti-aliasing enabled or disabled. Anti-aliasing adds a "Soft and blurry" effect to the strokes. Some people may not notice this but I do, and I find this blurry effect a bit distracting, like using ink that bleeds. With the Anti-aliasing Disabled (you can toggle this setting under Preferences > Open GL) it's the total opposite effect. The strokes are pixelly and jagged. This is even more distracting so I usually go with the Anti-Alias mode.

In my ideal world, I would love it if ToonBoom's line quality was crisper, like Flash's, while maintaining its smoothness and accuracy... 

Editing Strokes
To be honest though, I am so used to manipulating vectors in Flash it's weird to not have to do this in ToonBoom. Actually it's more time-consuming to edit strokes in ToonBoom because the Contour Editor feature requires a familiarity with Bezier points and handles... something I never had to learn. The thing I like about Flash is that you can just push and pull strokes into their perfect curve at ANY POINT ON THE CURVE without even having to SEE those points.

Smoothening Strokes
Both programs have a smoothening feature. I have yet to figure out how to smoothen only PART of a stroke in Animate. In Flash, you can very quickly select a part of a stroke and smoothen only this part. In Animate, the entire stroke is selected.
Tips, anyone?

A new blog

Welcome! A new blog to document our experiences learning and using Toonboom's new ANIMATE animation software.

We were first introduced to Toonboom's products back in June 2006, and attended a training session organized by Joel Kuwahara of Film Roman. It was a two-week part-time course and we touched lightly upon every feature of Toonboom SOLO (which then became DIGITAL PRO).

We were impressed with Toonboom SOLO but we didn't make the switch from Flash to Toonboom at the time because we had already started production on an animated feature (Los Campeones De La Lucha Libre) using Flash. What an experience that was, and it pushed us towards finding a more reliable all-inclusive animator-friendly program to serve our needs...


This year we are making the big switch. ANIMATE appears to be a more streamlined, lighter, simpler and cleaner version of DIGITAL PRO. It is also more affordably, in the same price range as FLASH. Much easier to use, less clunky. Yes, there is a learning curve when switching from Flash - both thrilling and frustrating but ultimately, rewarding. This blog is a place to record and share parts of our working process. Feel free to leave comments with your experiences, questions and answers!

SOME LINKS: